Taco Squash Bowls

As you may have guessed by the name of my blog, I’m frequently on the go.  I have a full time job managing a team of healthcare IT professionals in the pharmacy department of a large academic medical facility plus 2 other part time/PRN pharmacist positions – one as a staff pharmacist at a smaller hospital and one as a consultant pharmacist for a physician-owned surgical center.  I’m also an active member of a women’s group focused on developing the potential of women and promoting volunteerism.  I play sand volleyball in 2 different leagues 3 out of 4 seasons of the year plus strive to squeeze in at least 4 workouts a week.

While I love cooking, there are weeks when I don’t have much time to devote to preparing meals so I have a few quick and easy things in the regular rotation.

Some variation of these taco squash bowls are eaten in my house on the reg.  They’re super quick and easy plus are basically just meat and veggies – so they pack a protein punch plus all the goodness that only vegetables can provide.  So it’s a no brainer that they make an almost weekly appearance on the menu at home.

Additionally, so many variations can be made that it never gets old!  Just use a little creativity and you’ve got a different spin every time!

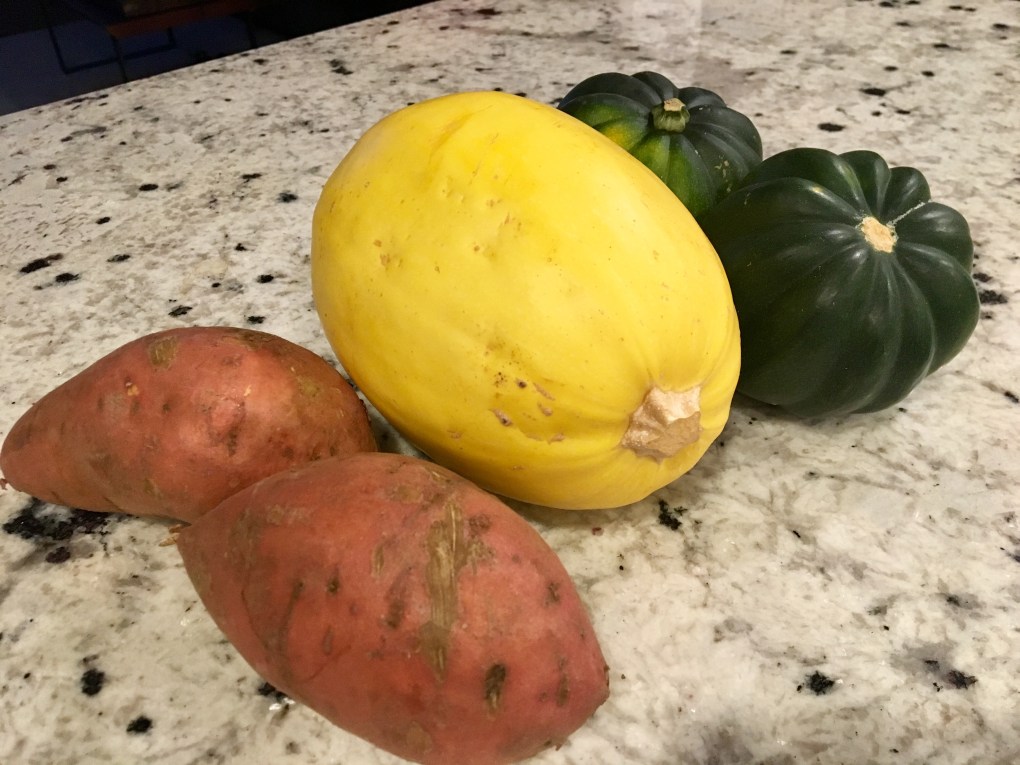
Some of my favorite veggies to prepare this with include acorn squash, spaghetti squash, and even sweet potato!  These are all regularly found stocked in my kitchen so it just depends on what I’m feeling like or which one needs to be used first.

2018-02-11_20-03-57_443

I generally make these with taco meat, but I had some leftover pork tenderloin carnitas (don’t worry, I’ll post how I made that later!) in the freezer so I used that this past week and it was equally if not more delicious!

Toppings can be just about any of your favorite taco toppings as well!  I love mixing it up with diced avocado, various salsa varieties, green onions, cilantro…you name it!  I’ve also added diced, cooked onion and garlic to the taco meat mixture for even more veg and flavor!

Here’s the pork carnitas version with avocado2018-02-07_17-06-54_862

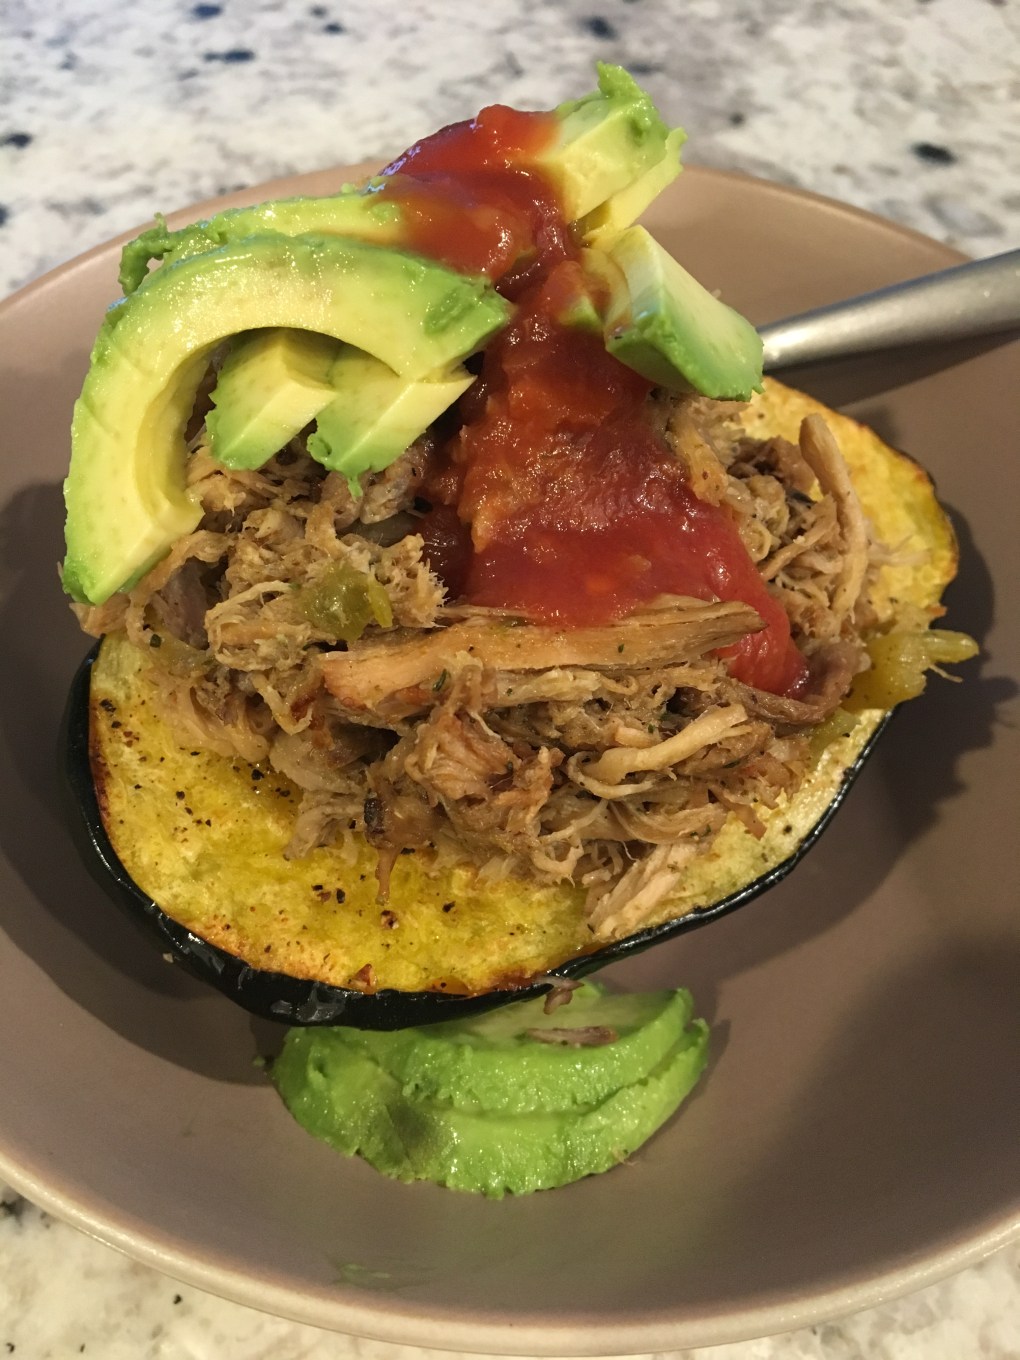
And here’s the original with taco meat, salsa, and non-dairy cheese substitute

2018-01-30_18-39-56_238

So…..let’s get started, shall we?!

Taco Squash Bowls

Serves:  6                                                         Total Time:  30 minutes

Ingredients:

  1. 2 lbs ground turkey, chicken, or lean beef (I generally use a 1:1 ratio of lean ground beef (at least 93% lean) plus ground turkey or chicken 99% lean)
  2. 2 packets reduced sodium taco seasoning (or 1 depending on the brand – follow instructions for 2 pounds of meat)
  3. 2/3 C water
  4. 1/4 C quick oats, optional
  5. 3 small acorn squash, roasted
  6. 1 T olive oil
  7. Salt and pepper to taste

Instructions:

  1. Roast the acorn squash.  Preheat the oven to 425F.  Cut the acorn squash in half length wise and scoop out seeds. Drizzle cut side with olive oil and sprinkle with salt and pepper.  Place cut side down in a baking dish lined with foil and bake for 20-25 min or until a fork inserts easily into the skin.
  2. Cook the taco meat.  Cook beef/turkey/chicken mixture in a skillet over medium heat until no pink remains.  Drain all fat.  Add taco seasoning, water, and quick oats (if using).  Stir to combine, cover, and cook for a few minutes until water has absorbed.  The addition of the oats makes the meat mixture less crumbly and makes it stick together more.
  3. Assemble the bowls:  spoon taco meat mixture into half cooked acorn squash.  Top with garnish as desired (definitely add the salsa!) and enjoy!

These store really well and reheat easily for quick weekday lunches with the leftovers!

Nutrition Info (including 2 T salsa and 1 T vegan cheese alternative shreds):

388 total cal, 36g protein, 36g carb, 10g fat


Note:  CeceOnTheGo participates in the Amazon Services LLC Associates Program, an affiliate advertising program designed to provide a means to earn fees by linking to Amazon.com and affiliated sites.  The products linked are products actually used when preparing this recipe


Sweet Potato Protein Pancakes {gf, df}

As I’ve mentioned in other posts, I try NEVER to skip breakfast.  Especially since I typically work out in the morning before work, I’d be a hangry mess by mid-morning if I skipped this important meal!

I also make sure to incorporate at least 20 grams of protein into my breakfast, as otherwise I’m prone to the dreaded blood sugar crash.  I used to be a carboholic in the mornings, generally eating only dry cereal and a banana, along with my coffee.  After wondering why, for the longest time, I was consistently feeling shaky, slightly nauseous, light headed, and on the brink of a major headache around 10:30am, I finally figured out that I was likely experiencing an insulin spike following my carb-loaded breakfast which resulted in low blood sugar and all the aforementioned symptoms.

So, alas, protein is a must in ensuring my first meal of the day sets me up for success! This generally means I tend towards savory breakfast items.  But sometimes I still crave something sweet so I started experimenting with protein pancakes.  I probably make these once a month, usually on a weekend morning, as a special treat.  This version incorporates sweet potatoes, but I’ve also done variations such as banana + slivered almonds, frozen blueberries + walnuts, even added powdered peanut butter for some extra deliciousness!  The possibilities are endless really…you may just need to adjust the non-dairy milk amount or coconut flour to get it to the right consistency.

I also recently started adding collagen protein to my pancakes, along with each morning in my cup of coffee, in smoothies, in oatmeal, really just about anything!  Warm or blended foods tend to work best as it can get a bit lumpy when incorporated into cold things.  A good brand should be flavorless, unless of course you’re looking for more of a flavored version.  Collagen consumption has many reported benefits and personally I’ve seen a definite effect in the strength of my hair and nails.  The link to the product above also contains a good description of some of the other reported benefits such as anti-aging, bone and joint health, and gut health.

Sweet potato pancake batter

The batter turns a bit orange, partly from the coconut flour and partly from the sweet potatoes.  As you can see, I also try to leave the sweet potatoes a bit lumpy as I like the texture of them.

Cook these over medium-low heat to allow them to cook through as well as to hold together better.  Let them hang out long enough until they slide around on the pan easily.  I constantly get too impatient and end up with broken apart, ugly pancakes.  Luckily I only ruined the first few of this batch and was able to get a few that were picture worthy!

Sweet Potato Pancakes

Sweet Potato Protein Pancakes {gluten-free, dairy-free}

Servings: 2-3

Time: 20 minutes

Ingredients:

  1. 1 medium sweet potato, cooked
  2. 4 large eggs
  3. 2 scoops collagen powder, optional
  4. 1/4 C coconut flour
  5. 1/4 C cashew milk or non-dairy milk of choice
  6. 1 t pure vanilla extract
  7. 1 T coconut sugar, honey, or pure maple syrup
  8. 1 t cinnamon
  9. 1 t salt
  10. 1/4 t baking powder
  11. 2 T coconut oil, divided
  12. Toppings of choice, such as drizzled almond butter and chopped nuts (pictured); thawed, frozen berries; additional maple syrup or agave syrup, gf granola, etc.

Instructions:

  1. In a small bowl, add eggs and lightly beat with a whisk.
  2. Add cashew milk, vanilla, 1 T melted coconut oil, sweetener, cinnamon, and salt and whisk to combine.
  3. Add baking powder, coconut flour and collagen powder, whisking just until no large lumps remain.
  4. Add the cooked sweet potato and use the whisk to incorporate and break up slightly as necessary, leaving it a bit lumpy.  At this point, you could include whatever add ins you want, adjusting the non-dairy milk or coconut flour as necessary.  Tip:  I didn’t have a cooked sweet potato on hand so I scrubbed one and then heated it in the microwave for 4-5 minutes until it was soft.  Then I cut it in half and used a spoon to scoop out the inside and discarded the skin.
  5. Working in batches, heat about 1/4 T remaining coconut oil in a skillet over medium-low heat.  Once oil is melted and the pan is heated, add small amounts of batter, approximately 1/4 C, to the pan.  Allow to cook for 3-4 minutes or until fully set, flip, and cook other side for additional 3-4 minutes.
  6. Top to your heart’s delight and enjoy!

Nutrition Info (based on 2 servings, without toppings):

450 total cal, 25 g protein, 29 g carb, 25 g fat


Note:  CeceOnTheGo participates in the Amazon Services LLC Associates Program, an affiliate advertising program designed to provide a means to earn fees by linking to Amazon.com and affiliated sites.  The products linked are products actually used when preparing this recipe

Immune Boosting Chicken Vegetable Soup

This has been a rough week for several reasons.  After spending a long weekend on an amazing ski trip with friends, I wasn’t able to get on track with my normal weekly activities.

We returned home on Monday evening then returned to work on Tuesday.  Every evening of the week, there was some after-work activity to run to – volunteer group meeting, work related late evening meeting, college basketball game tickets…thus I never made it to the grocery store.  Luckily, I had a few things left over in the freezer to get us through the week food wise.

On top of having something to do every evening, one of my dogs got an upset stomach and threw up on me and in the bed in the middle of the night, I didn’t sleep well due to a headache another night, and then to top it off woke up with a stomach bug Saturday morning, all leading to being pretty exhausted.  Needless to say, I also didn’t make it to my normal workouts this week.

After spending the entirety of Saturday lounging around (and staying close to the bathroom), I started to feel a bit better Sunday so decided to finally get out of the house and to the grocery store.

Whenever I’m not feeling well, I always crave my mom’s homemade chicken noodle soup.  However, no matter how many times I’ve attempted and gotten guidance from my mom, it never seems to turn out the same.  I think she’s holding back some of her ingredients from me on purpose 😉 .

This time, instead of trying to mimic my mom’s soup, I decided to give it my own spin and throw in a few ingredients that are touted to help reduce inflammation and boost your immune system.  While I can’t speak to the science behind these claims, I can report that it was pretty yummy and hit the spot, which was welcomed for this very empty stomach!  My husband, who claims not to like chicken noodle soup, even liked it, helping himself to a second bowl.

I used onion, garlic, ginger, thyme, oregano, cayenne, turmeric, and fresh lemon in this soup.  All of these reportedly boost immunity, although I haven’t looked into the research to support that.  Regardless, it can’t hurt, especially when it made for a really tasty end product!

Ingredients:

Servings: 6                             Total Time:  1.5 hrs

  1. 1 whole chicken, approx. 6 lb
  2. 3 bay leaves
  3. 6 C chicken broth, divided
  4. 3 – 5 large carrots, peeled and cut into 1/4″ rounds
  5. 4 – 6 celery stalks, diced
  6. 1 medium onion, diced
  7. 1 head cauliflower, cut into small florets
  8. 8 oz kluski (egg) noodles, optional*
  9. 2 cloves garlic, minced
  10. 2 t ground ginger
  11. 1 t ground thyme
  12. 1 t ground oregano
  13. 1 t ground parsley
  14. 1 t ground turmeric
  15. 1/8 t cayenne pepper
  16. Juice of 2 lemons
  17. Salt and Pepper to taste

Instructions:

  1.  Place the chicken, breast side down, along with 2 C broth and 2 bay leaves in pressure cooker.  Lock lid in place and heat over high heat until rocker starts moving.  Reduce heat to medium and cook chicken for approximately 35-40 minutes.  Turn off heat and let pressure release naturally.  Once the pressure is released, remove the chicken and set aside to cool.  Remove bay leaves and discard.  Pour broth into fat separator, such as this one.  Allow to cool and reserve.  Once the chicken has cooled, remove the skin and any visible fat.  Roughly shred chicken meat with hands.  I used mainly the white meat for this recipe (and let my hubby pick over the legs and thighs 🙂 )
  2. While chicken and broth cool, in a large stockpot, heat about 2 cups of broth over medium low heat.  Add the onion, garlic and celery and allow to simmer for about 5 minutes.  Add herbs/seasonings and remaining broth (fat removed).  Taste and add salt and pepper as needed.
  3. Bring to a boil and add noodles and remaining vegetables.  Reduce heat to simmer and allow to cook for about 15-20 minutes.  During the last 5 minutes of cooking, add the shredded chicken.  Just prior to serving, add the lemon juice

Notes:  To save time, you could use a pre-bought rotisserie chicken.  However, I find pressure cooking it the best way to keep it moist and delicious!

To keep this lower carb, omit the noodles.  It will still be plenty hearty and filling with all those vegetables and chicken!

Nutrition Info:

350 total cal, 38g protein, 40g carb, 5g fat (including noodles)

Note:  CeceOnTheGo participates in the Amazon Services LLC Associates Program, an affiliate advertising program designed to provide a means to earn fees by linking to Amazon.com and affiliated sites.  The products linked are products actually used when preparing this recipe